Sup I'm Damo lots of people know me as Mixu. Just want to say hi to everyone on forums, I'm really active on SurfCombat and i enjoy playing csgo and other game that are fps.
Once you choose your render, save the image file, and open it up in a separate window within Photoshop.
(Just click File -> Open -> (Your Render)) This will open up a separate tab.
Using the rectangle marquee tool, highlight the whole render. Then simply CTRL+C, switch to your signature tab, and CTRL+V.
If the image is very large, select Show Transform Controls, and click one of the corners. You can then adjust these height and width values.
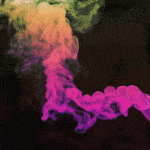
I prefer to centre the image, and have the player's name off to the side, but its all personal preference. Now, find a background image. Something that somewhat matches either; the colours of the foreground render, or something that matches the character itself. Adding a new layer below the render, with a black background and a simple circular gradient directly behind the render will emphasise the character. This is what mine looks like so far:
After adding my background on a new layer, adding a Gaussian blur to the background image (Filter -> Blur -> Gaussian (10p radius)) This is what it looks like.
Part 2: Smudging
I then duplicate the character render layer 4 times. (Make sure layer is highlighted, then press CTRL+J). By clicking the
small eye next to each layer, hide all but the first.
Now, time to smudge in the render into the background. Click on the smudge tool
Within the brush presets, find the Chalk 36 preset. Now click the preset edit button
These are the settings you want to have for the smudging.
Now, click on your first visible layer, and start smudging it. Smudge the hell out of it. Try not smudge it too far outside the borders of the render. Then, set the blending mode for the layer to Colour Dodge.
Blending mode can be above the layer window, next to the opacity selector.
Unhide the next layer, and do the exact same, but this time set the blending mode to Linear Dodge.
Continue doing this, alternating between colour dodge and linear dodge with every layer, until there is only one layer left.
This is what it should look like:
Now, slightly smudge the edges of the top layer, so it blends with the lower layers. I added very little, as it didn't work as well with this render. It's all preference as well.
I added another layer behind the smudges, and added another white circular gradient, so the smudge isn't so harsh. Using the eraser tool on the outsides of the smudging layers
is a very good way to soften the edges. To do this, set the eraser tool to whatever size you prefer, and set the hardness to 0. Because the smudging was so
light, I set the two top smudge layer's blending mode to darken.
Here's what mine looks like so far:
Part 3: Finalising (Font, final adjustments, etc.)
Sadly, I am absolutely terrible at font choice, and stuff. I use http://www.dafont.com to find my fonts, and then style my fonts using either non-contrasting colours.
This is what I did for this one.
Personally, this wasn't the best of creations. Got extremely lazy with the font. It's 2am so deal with it :^)
This is my first tutorial, so please hmu with feedback. Hope this helped people see some techniques I use when creating signatures. I'm still quite new to photoshop, but I'm passing on knowledge as I gain it.
Alright lads and ladettes, This is going to be a little tutorial to help all those who are new or maybe a little inexperienced and want to learn how to warden.
(For this im going to assume you know how jailbreak works and what the roles of a Prisoner/Warden are.)
To learn how to use and learn what Warden tools are click here!
**Warden tools are essential to being a warden so please take your time learning how to use them**
**Jailbreak Vocabulary And Rules** To learn Jailbreak Rules And Vocabulary click here!
1. Aim. To kill all prisoners who rebel, Lose at games, Disobey orders. To win the game you must kill all prisoners (within rules) until Last Request. Now it comes down to skill and your ability to listen to rules stated by Prisoners during LR as it is a minigame that the Surviving prisoners decide LISTEN CLOSELY!
2. Starting off the round. Take warden by typing !w or clicking 1 to claim warden as the round starts. (At this point you may access the warden tools and start a special day if you wish! If you don't continue reading!)
Give hot cell orders as fast as you can. "All hotcells must be ass on bars facing the back of their cells" Place a beam outside known hotcells so they know whether or not they must be ass on bars.
Once you have cleared all hotcells of rebellers and checked known spots where rebellers may be if there cell has an exit. Give cell orders (These must be before 12:00 and must be stated clearly.) Example: When cells open all T's MUST RUSH to **Designated Area** /OR/ One step out of cells, Button freeze. Face the back of cells (Face the back of cells is so you can check if the Prisoners have weapons that you our your guards may have missed during hotcell check)
3. Transporting Prisoners The easiest way to transport prisoners is to use Draw tools, Type in chat !wt this will open the Warden Tools once warden tools is open select draw tools then spawn a beam. Now that you know how to place beams give your prisoners Beam Orders these can be: All T's when i place a beam Rush to my beam and Button freeze. These beam orders make it very easy to transport your Prisoners from cells to games and so forth, *Make sure you have guards on either sides of the prisoners so they cannot run away*
4. Playing Games With Your Prisoners Now you have learnt to use beams, Place beams in safe areas for Prisoners to walk to and lead these beams to a map game or an area you wish to play a game in.
Once you have reached your map game or an area you wish to play a game in specify the rules you wish these prisoners to follow while they play this map game / game. For example "No Jetpack, No Auto-Bhop all T's Must actively attempt (Insert Game Here) at all times or you will be KOS." Before your Prisoners start their game give them a demonstration by pressing a start button or activating the game so the T's know how to play!
5. Last Requests. If you have reached this point as a warden GOOD JOB! you made it to LR. Now you do not have any control over the T's at this time. If they rebel or break their own Last Request rules they become Rebellers Which makes them KOS. If they don't rebel, Enjoy, Focus and Listen VERY carefully to rules specified by the Last 2 Non-Rebelling prisoners as they play games with you guys. *You may order T's to have an active LR beacon within 20 seconds. You MUST give a minimum of 20 seconds to LR, If they don't follow LR by the time specified they are rebellers!
/TutorialEnd/
This took me a long time to make and I'd appreciate if you have any suggestions of things that i need to add to this post please message me! If you need any clarification or more help send me a message and i'll help you out!
Peace.
[font=Comic Sans MS]How Jetpack works
Most people in combat surf always ask me how to bind jetpack or how jetpack works. So i am just going to make a tutorial so people can refer to it when needed!
Just a note for people who dont know how to open console what you gotta do is press `
If you dont know where this key is you gotta look for 1 on your keyboard and the button is on the left on it
So if you buy jetpack in the store the bind to set it is
bind (key you wish to use to activate it) +jetpack
Note: Mouse 3 is a common bind for jetpack as it is easy to reach.
Afterwards the key you binded it to will be the key to use your jetpack. So basically how you use jetpack is this:
< Press space then hold your jetpack key.
This makes you go flying up into the air and gives you a strategical advantage from other players around you.
Pros < Makes you fly!
< Gives you an advantage
< Enables you to go to spots you normally cannot reach
< Avoid bullet shots
Cons < Can accidentally press the button and fall off
< Can get you stuck
 i miss invex.